When "synching" carbs, what you are trying do is synchronize
the throttle plates of the 4 of them. Ideally, each cylinder is carrying
25% of the load. Carbs that are not properly synched will affect the
quality of the idle. It's a good idea to check the valve clearance before
checking the carb synchronization, as it can affect the synch adjustment.
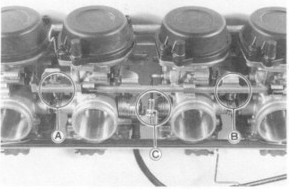
This picture shows you where that adjustment will be made. The "A"
screw will synch carb #3 to #4, the "B" screw will synch carb
#1 to #2, and the "C' screw will synch the 2 pairs to each other.
That rubber cap is where you will be connecting the rubber lines from
the manometer (the synch tool). You do have one of those, dont you?
The most common are the mercury tube type. They're inexpensive and will
get the job done. Another common type consists of dial gauges in a rack.
The best kind of all is one that you can borrow from someone for free!
Don't lose those caps. You'll be putting them back on when you're finished.
Now, we're almost ready to get started. If at all possible, it's a good
idea to have a house fan in front of the engine to provide cooling air.
If you're doing this for the first time, it might take a while and that
air and oil cooled motor can get very warm in a short period of time.
You'll also need a phillips head screwdriver to make any necessary adjustments.
Go ahead and pull the gas tank. You'll need something to use for a
temporary tank while you're doing the check/adjustment. I use a plastic
bottle with a cone shaped cap. I connect a piece of fuel line to a plastic
T-fitting which, in turn, is connected to the 2 fuel lines that you
disconnected to remove the tank. You can get some very nice devices
that are sold for just this purpose*. If you don't mind spending a little
extra cash, go for it.
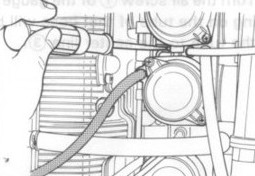
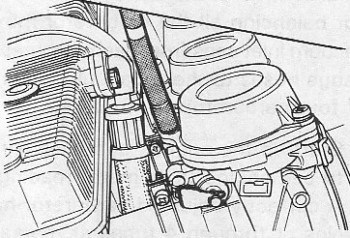
Connect 1 hose from the manometer to each of those 4 fittings. Keep
track of which hose goes to which fitting or you'll be chasing your
tail when it comes time to make adjustments. (You've been warned.)
Also, be sure to block off the vacuum line to the petcock. A vacuum
leak like that will cause you problems.
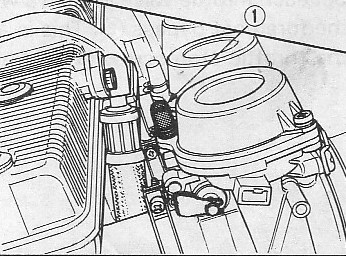
Now, fire it up, let the motor warm up, and set the idle to approximately
1700 RPM by the tach. Here's where the idle stop adjuster is located.
Turn it clockwise to increase the idle. You shouldn't have to turn it
very far.
If you're using the mercury type manometer, be careful with the throttle.
If you rev the motor and let the throttle slam shut, the vacuum level
will rise significantly and you'll end up sucking all of the mercury
out of the tool and into the motor. Obviously, if you are using gauges,
this isn't a concern. If you move the throttle slowly, you will avoid
that high vacuum condition.
Ideally, all 4 level (or gauge readings) will be the same or as close
as possible. If not, it's time to make that so.
Go ahead and make the adjustments. A little adjustment makes a big difference.
You should not have to turn that screw very much, one way or the other.
Watch the manometer and try to get those 2 carbs as close as possible.
Now you know why I told you to pay attention to which hose is connected
to which carb.
Make the adjustments in the following order:
"A" to synch the #3 carb to #4
"B" to synch the #1 carb to #2
"C" to synch the left pair to the right pair.
All good? Button it up, set the idle back to 1,000-1200 RPM, and go
for a ride. If the synchronization was off, you should notice a much
smoother idle now. Congratulations, you just saved yourself from paying
someone $100 to do that job.
While you're in there, you might as well run the plugs out and see what
kind of shape they're in. Check the air filter, too.
Man, this made me thirsty...
CV Carb synchronization instructions
The official beer of 771Doug !
* I have since bought one of those auxiliary tanks from Motion Pro and
it makes this job much less unpleasant.
WRITTEN BY DOUG
Setting float height can be kind of intimidating for some people, but
it's not hard to get it right. The trick is to hold the carbs as they
would normally be positioned, then slowly tilt them until the float
just "flops" down. The height should be measured at that exact
spot. You may have to do it a couple of times to get that "sweet
spot", which should be at the point where the carbs are almost
horizontal. (This pic might be a little misleading in that you won't
have the carbs this far over, but maybe closer to 45 degrees.)
The floats are connected to a valve that feeds gas to the bowls. Inside
that valve is a spring. You want to measure with the little metal tang
touching the valve, but not compressing the spring. Measure the distance
from the gasket surface to the highest part of the float.
The factory shop manual lists the recommended float height at 13.5 -
15.5mm. My bike likes the floats at about 15.5-16mm. Normally, if you
are within the factory spec, you'll be fine.
If you find that your floats are not within spec or you're experiencing
a float height related problem, the height is altered by bending the
metal tab. Go easy here. A little bit goes a long way. You don't have
to remove the float assembly to alter the height, I just did that in
this picture for the sake of clarity.
When you're measuring the height, be sure that the float assembly is
"seated" in the carb body. If you hold down the "frame"
of the assembly with your finger, you will get a more accurate measurement.
Be careful that you don't push down too hard and cause the assembly
to be distorted, though.
Improper float height can cause a number of problems, primarily in the
lower midrange, say 2-4K RPM. Bear in mind that increasing the float
height measurement will actually lower the fuel level in the bowl and
decreasing the float height number will increase the fuel level in the
bowl. Remember, the floats are mounted upside down in the carb.
Lower float height / increase the measurement to counter a rich condition.
Raise float height / decrease the measurement to counter a lean condition.
If you think you have a problem that appears to be carb related, go
to the Factory Pro tuning page. This page is the absolute best carb
tuning resource I have found and it will save you hours of time and
frustration.
|